A long time ago, at least in technology terms, I bought a Cowon iAudio X5 digital media player – if memory serves me correctly it was December 2005. It wasn’t cheap at the time but it was solid, and came with 60GB of storage.
I’ve used it a lot when driving and travelling. Even now that I’ve got a reasonably large collection of music on my phone, this blocky little media player still has a place – especially when it comes to longer trips away, giving me an extra 10 hours of playing time.
Last month I plugged it in to charge and there was a tiny popping sound and the screen went blank. The device would no longer charge. At first I investigated and thought a loose battery wire was causing the issue, but a quick solder proved that thought incorrect.
A quick search of the battery part number resulted in a replacement being ordered from fusionbattery.co.uk. Once this arrived it was just a matter of installing it.
Replacing the iAudio X5 battery
Step 1: Removing the back cover

The screws are small, but they’re a standard Philips head, so it’s easy to get sorted.
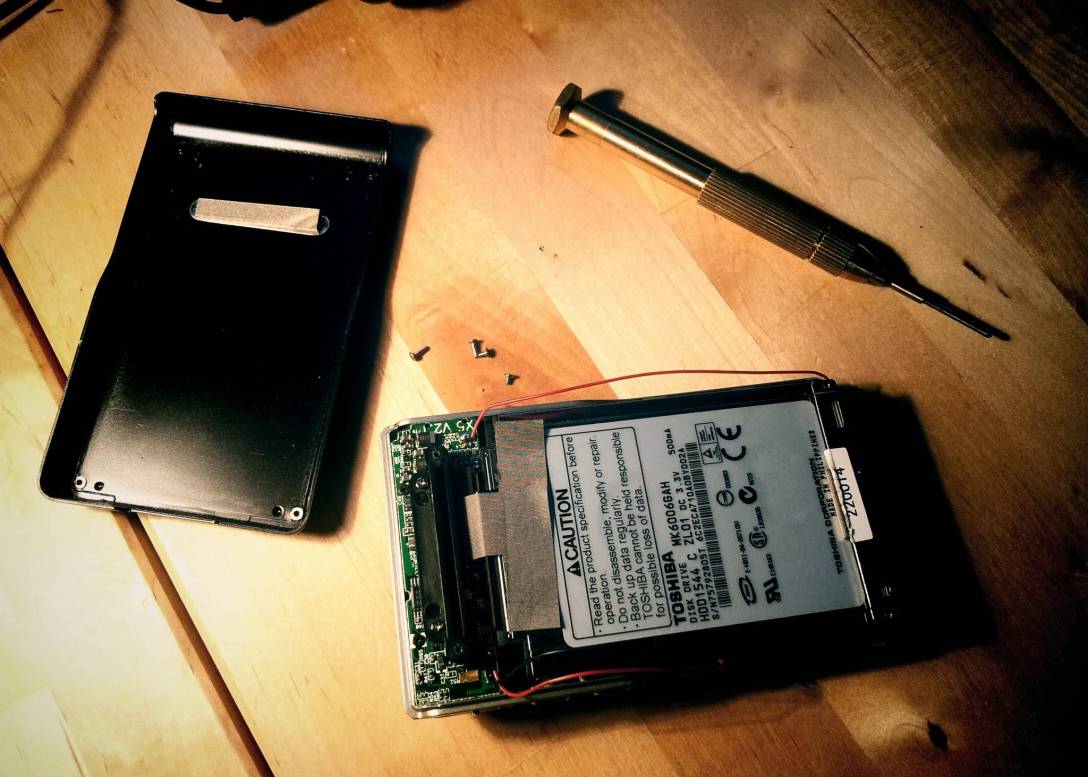
Step 2: Removing the hard drive

Next up you need to take the hard drive out. There’s a small piece of tape at the top of the drive which you need to peel off, then you can pull up the top of the drive and slide it out from the base of the unit. There’s no need to unplug the drive cable.
Step 3: Reveal the battery

Underneath the hard drive there’s a small rubbery moulded plastic separator. This is fairly easy to remove and you’ll see the battery with cables soldered to the motherboard.
Step 4: Un-solder the old battery

Now you can just un-solder the old battery, re-solder the new battery (red wire bottom, black wire top), and put the device back together.
Step 5: Et voilà

Once putting it all back together, I plugged it back into its charging dock and lo and behold she happily started charging again.
It might be old, somewhat clunky and not exactly head turning, but it works, and it continues just working. I’ve got Rockbox installed on it and lots of good music. It plays FLAC, OGG and other files types often not played by other digital media players. And it’s still going strong!

Actually, have the XL version, which is slightly different although the principle is the same. Just not sure which wires to un-solder and re-solder. I think its coz i have the wrong battery. The replacement battery I ordered has only 1 red and 1 black wire coming out of it. But, the currently installed seems to have 2 of each. I’m pretty sure that the ad said the battery was good for the XL version though. Its just that I got the battery so long ago and only now getting round to attempting the replacement because I didn’t have a soldering iron before for one and also other reasons…
If you have any input or comment/advise, i’d sure appreciate it.
Thanks in advance
LikeLike
Hi Conrad,
It’s a while since I did this but it sounds odd that there’d be two red and two black wires – unless of course they’re both soldered to the same points. In which case I’d suggest that the original XL model just had two of the same batteries that came in the non-XL version (presumably for savings at scale).
I would imagine if the two red and two black wires coming out of your old battery pack are going to the same points on the board, then you can just unsolder them and solder the single red and black wires to the same points and it should work fine.
Fingers crossed!
Hope that helps,
Alex
LikeLike
UPDATE:
Unfortunately, its not worked out. I soldered the red and black wires together as set out in earlier post but there is no power showing and it remains dead. Its the first time I’ve soldered and quite possible I didn’t do it right. :s
LikeLike
Hey Conrad,
Sorry for the delay getting back to you.
I would think soldering the red and black together could be problematic. I was suggesting that the two black wires get soldered together and the two black wires get soldered together – but then maybe that won’t work because it isn’t a circuit – it’s a split.
Perhaps you have to find someway to solder them in serial?
I’m not sure how that would work.
Have you tried just soldering in one of the batteries by itself?
LikeLike
Hi Alex,
Actually, I did not solder the red and black together, but red with red and black with black. there were 2 reds and blacks from the machine which I soldered to the single red and black from the battery, fusing 3 x red and 3 x black wires.
Is it possible the battery is incorrect for the machine? when I got it on ebay it did clearly stipulate that it was for my XL, so…
I am inexperienced when it comes to soldering and electronics in general, and there are virtually no youtubes showing how to do this. I wanted to suggest, if you’re interested, I could send the machine to you. If you can make it work you’re welcome to keeping it. All I would ask is whether you could recuperate the music. It’s what I’m most attached to now. Interesting thought? Let me know
LikeLike
5xl has two batteries chained together, hence extra wires. remove/unsolder both, and replace with a singel new one 🙂
LikeLike